All Posts By

Sionann

Recipe

Breakfast Burrito With Rice Paper

burrito with rice paper, Breakfast Burrito with Rice Paper

I order spring rolls pretty much every time my husband and I go out to Thai food. I love the chewy texture and vibrant colors that peak through the veil of rice paper. I’m a big fan of mochi and rice noodles as well! After one of my recent visits to a sushi place, an idea struck me: What if I made a breakfast burrito with rice paper??! Holy shit, am I some breakfast genius?

I did some googling, and it turns out a breakfast burrito with rice paper has been done before.

However, it’s received way less attention than I would think. I’ve seen fruit and floral spring rolls trending on Instagram lately, which I still want to try. This time, however, it was a matter of what was available to me, so I was inspired to create a colorful breakfast burrito with rice paper.

The great thing about this recipe is how versatile it is. Rice paper is naturally gluten free, which is a huge plus! That opens the possibilities to an even larger and more diverse group. I’m always on the lookout for easy and quick meal options for my husband, as well as any guests that grace our doorstep.

You could incorporate fried tofu, sweet potato, hash browns, cheese, veggies, or nearly anything else that belongs with breakfast. I’d love to try both a tofu scramble and breakfast oats in some rice paper soon.

For the sake of simplicity—and what I had in my fridge—I used egg, avo, and goat cheese for my recipe today. I also purchased rice paper on Amazon ahead of time in preparation.

I hope you enjoy this recipe for a Breakfast Burrito With Rice Paper!

Breakfast Burrito With Rice Paper

Print Recipe
Serves: 1 Cooking Time: 5 minutes

Ingredients

  • 2 eggs scrambled (or 1 cup of cubed tofu, scrambled)
  • 1/2 small avocado
  • 2 oz. goat cheese
  • 2 sheets of rice paper
  • Sriracha

Instructions

1

Scramble eggs until fluffy

2

Cut and cube avocado

3

Soak each sheet of rice paper in warm water for 5 seconds (or per manufacturer instructions) and place on a plate

4

Put all ingredients on the rice papers, distributing evenly, and roll.

5

Serve with ketchup, hollandaise, hot sauce, or whatever!

DIY

How to Build A Porch Swing

build a porch swing

Lately, my husband and I have been putting a lot of focus on making our porch and back patio more comfortable for entertaining. This has included a lot of things, such as purchasing new patio furniture and an ivy trellis, which I’ll feature in another post. Something I’ve always really wanted was a porch swing. I find something romantic in the safety and coziness of a good porch set-up. An ideal place to sip wine or coffee while cozied up to loved one. So after shopping some things online, I decided it would be best for me to learn how to build a porch swing.

I viewed lots of tutorials and different DIY porch swing options. There are quite a few beautiful tutorials on how to build a porch swing, but they aren’t accessible for the average person. Most people don’t have every type of saw available to them. Furthermore, even some of the more basic models needed pocket holes, which are great but I didn’t want to fork out extra money for a Kreg jig. I wanted to design something that was functional, cute and—most of all— one that required as few tools as possible.

I have a lot of experience with basic woodwork because of building frames, mural panels, and wall jacks for festivals I work. If there’s enough lumber available, I can build anything. However, you don’t have to have previous experience to build a porch swing.

When you build a porch swing, it’s of the utmost importance that it’s safe. Most of all, no one wants the embarrassment of having their swing collapse on a guest or family member. Trust me; my brother has had two hammock swings collapse on him at my place (I didn’t make those, though, and was using a Husky brand velcro strap to hang).

Before you tackle this instructional on how to build a porch swing, read through everything first to ensure you don’t have to re-do steps.


Release of Liability:

These instructions and guidelines are provided as a resource and general advice/ recommendations regarding installing a porch swing. Each situation is unique, and it is your (the reader’s) responsibility to ensure the safe installation of any porch swing in and out of your home. 

This notice serves as a release of liability for thornandthimble.com and Sionann Ghahremani.


How to Build A Porch Swing

DOWNLOAD PORCH SWING PLANS

SUPPLIES USED

  • Tape measure
  • Drill
  • 2.5″ Wood Screws
  • 1.5″ Wood Screws
  • 2″ Finishing nails
  • Hammer (or nail gun if you’re lucky)
  • Sand paper/ Electric sander
  • Exterior paint
  • Safety glasses
CUT LIST
  • (2) 2′ x 4′ @ 55″ (base frame)
  • (5) 2′ x 4′ @ 21″ (base frame)
  • (3) 2′ x 4′ @ 27″ (back supports)
  • (12) 1′ x 3′ @ 55″ (seat and back slats)
  • (2) 1′ x 4′ @ 25″ (I accidentally miscalculated and did 24″, whoops)
  • (2) 1′ x 4′ @ 13″
HANGING MATERIALS
  • (2) Packs of 15′ chain link (zinc coated) for 340 lbs, working load
  • (4) 1/4″ quick links with 880 lb, working load
  • (4) Nylon lock nut, coarse
  • (2) 5/16″ x 4″ Screw hook lag thread
  • (8) Fender washers 1.5.”
  • (4) 5/16″ x 4″ Eye Bolt with Nut

The entire project cost me about $90.00, but if you need to purchase essentials link screws, wood glue, etc., you may end up paying closer to $100.

Start with building the frame.

Your frame includes the (2) 55″ 2′ x 4’s and the (5) 21″ 2′ x 4’s. There will be exactly 12″ of space between each seat support and the next.

First, I drilled pilot holes before I began gluing or screwing. For pilot holes, your want to use a bit that’s at least as large as the smallest diameter of your 2.5″ screw. Once that’s all the way through both pieces, you should use a drill bit that is the same size of your screw to re-pilot the first piece of wood/ entry point for the screw. The wider pilot hole here will allow the screw to pull the piece you’re attaching tightly, this eliminates any gaping in the wood. You can read more about why to use pilot holes here.

Once the pilot holes were complete, I applied wood glue to the seat support end and attached the screws, 2 for each piece. Then I repeated it on the other side.

Begin attaching the (3) back supports.

Now you’ll attach the (3) 27″ back supports. I used the same method of piloting, gluing and drilling here.  Instead of (2) screws, I used (4) for each support.

Lay your swing on it’s back to attach the front armrest support.

Next, I attached my (2) 13″ armrest pieces to the front of each side of the swing using (2) screws and wood glue. Make sure to use your smaller 1.5″ wood screws here to avoid hot-points.

Begin attaching (7) of the 55″ seat slats to your swing with the 2″ finishing nails.

You’ll nail them straight into all the base supports beneath them, being sure to keep the sides aligned neatly. I attached the back and front seat slats first, so each was flush with the back supports and front armrests, respectively. Then, I worked inward giving each slat a 1 1/4″ gap between them. I used (3) nails on the outside edges, and (2) nails per point of contact for the rest. Use your best judgment; things should be getting pretty sturdy by now.

Attach the 25″ armrest after nailing in the first two bottom (5) 55″ back slats.

I started with doing the top and the bottom slats first again. The top slat should be flush with the upper/ top part of the back supports, and the bottom slat should be flush and on top of the back seat slat.

The top of the second back slat from the bottom should be at exactly 8 3/4″, this will allow your to rest your 25″ armrest perfectly on that second slat for support.

Once that 2nd back slat is in, attach the 25″ armrest using finishing nails. Continue connecting the remainder of your backrest slats with equal spacing.

FINISHING

Use a piece of sandpaper or an electric hand sander to sand down any rough edges or pieces of wood. You want your swing to be splinter-free.

Paint your swing with whichever color exterior paint you desire!

HANGING

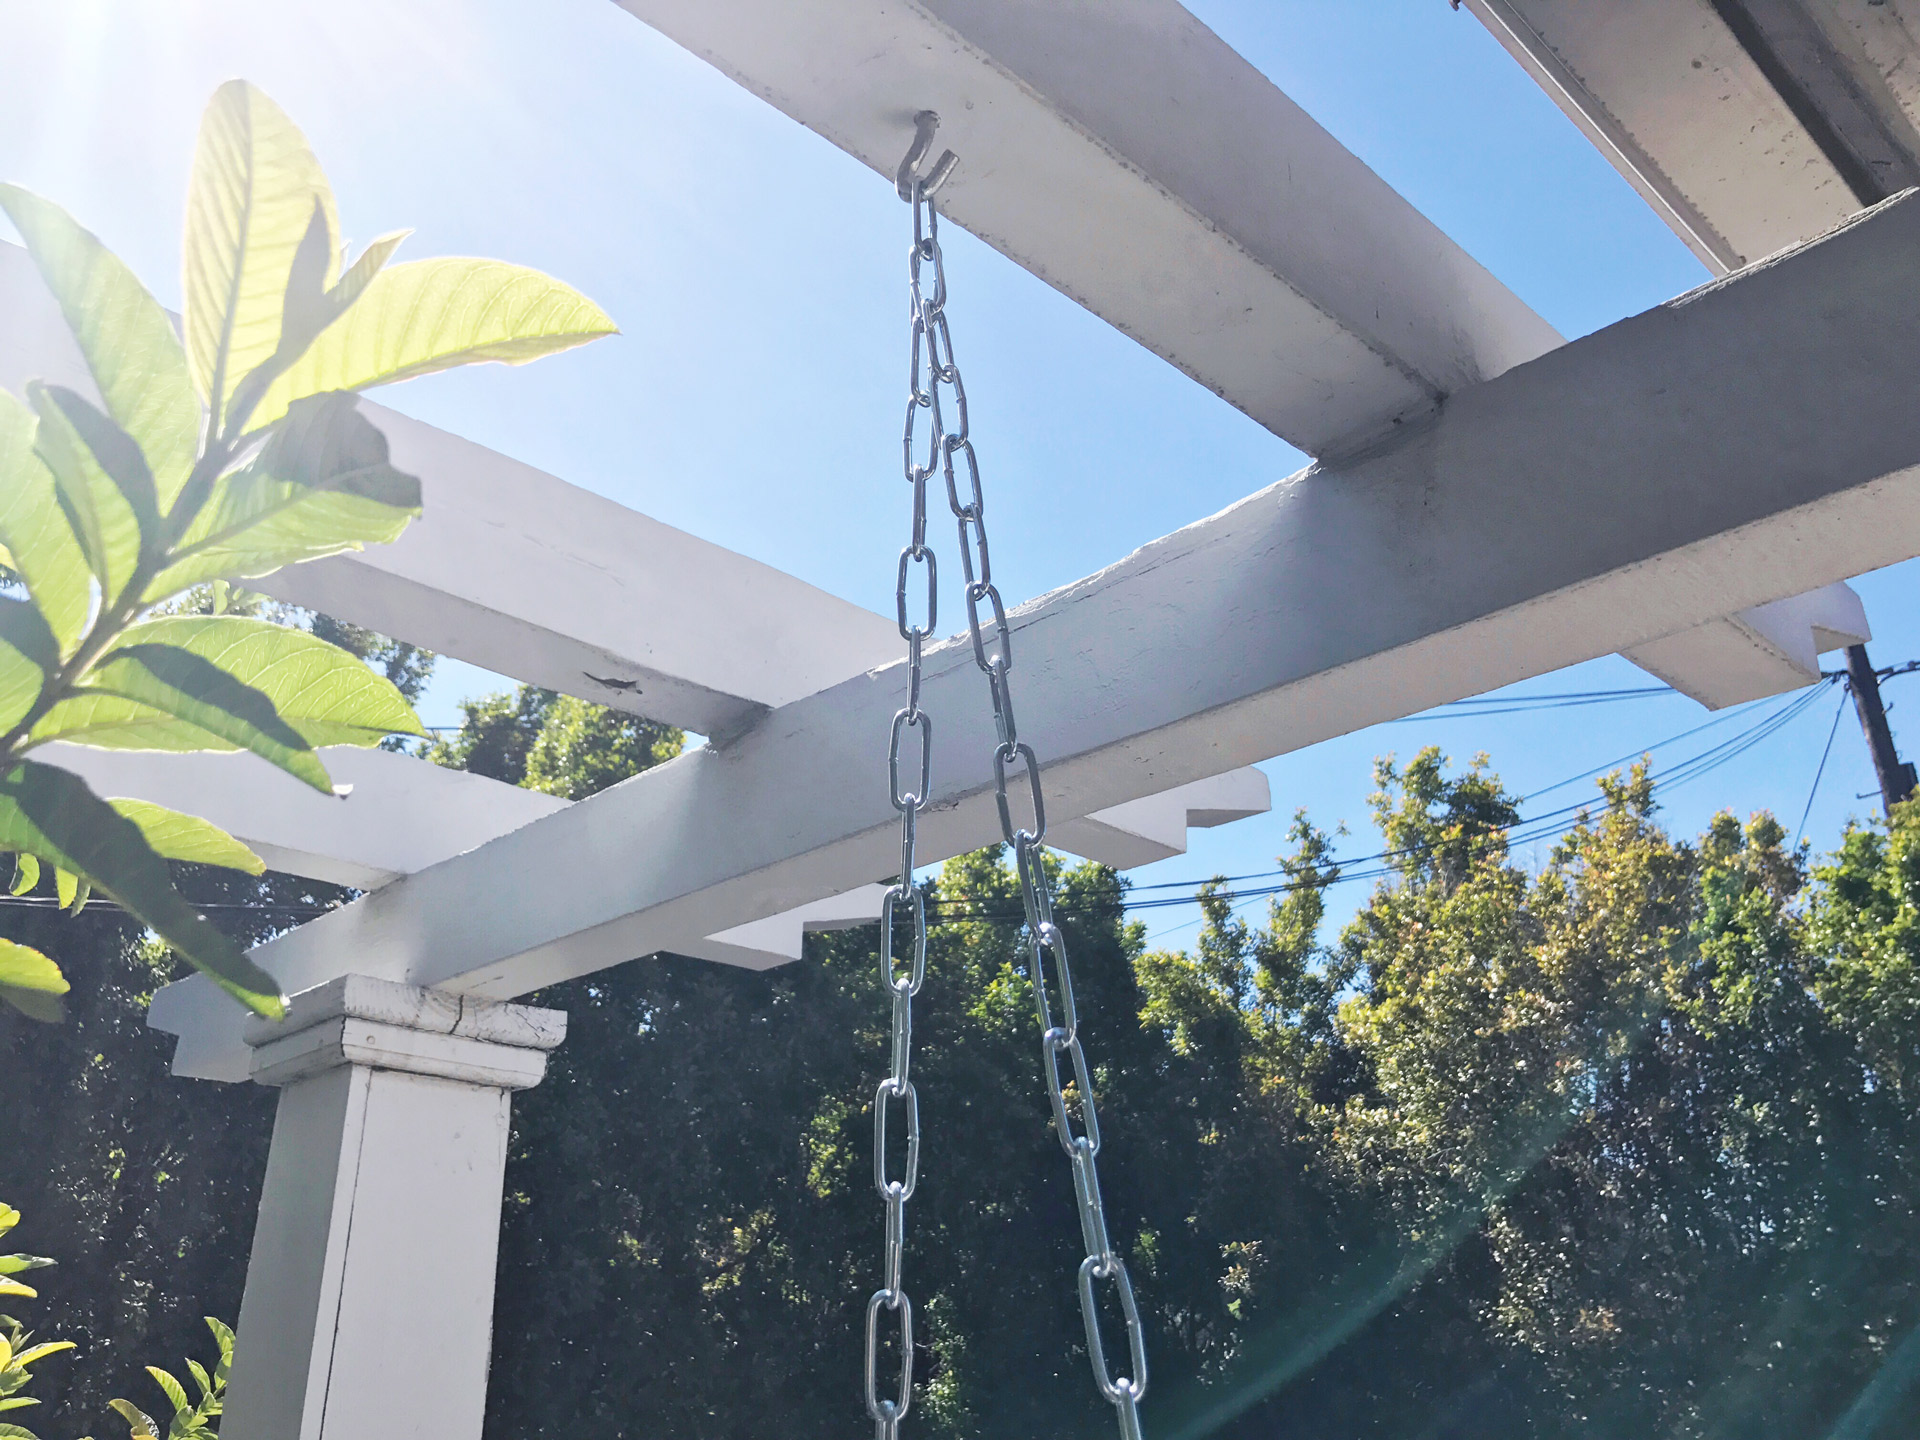
All of the swing hardware will attach to the swing itself except for the Screw hook lag thread, which will go directly into the ceiling/ beam you’re hanging from. If you’re drilling into a ceiling, make sure to use a stud finder. Measure your beam to allow at least 2 inches extra on each side of the swing to account for motion. So for a 55″ swing, you’d measure 59″ total. You’ll want to first drill a pilot hole that’s slightly smaller than your screw hooks threaded diameter. Then screw in the hook to complete.

For the hardware on the swing itself, you’ll want to use the same drill bit to create a pilot hole on the 21″ exterior of the swing base on each side. Use a washer as a guide to ensure the washers have room. Once the pilot holes are drilled, put a washer on your eye hook with the nut between the washer and hook, and screw in. You’ll cap the eye bolt with a washer and Nylon lock nut on the interior underside of the swing. Repeat on the other side.

Attach one quick link to each eye bolt.

For the chain, I found the center point of each 15′ chain and hooked that link onto the Screw hook that I installed in my beam. This gave me two even sides hanging down. Attach the hanging link to your quick link at the desired height. For reference, the front of my swing is suspended one link higher than the rear, with 57 links on the rear and 56 links on the front.

Ta-da!! Now you know how to build a porch swing! I hope you enjoyed this tutorial. Let me know how your projects went in the comments and reach out for any questions or concerns regarding this DIY.

Recipe

My First Breadmaking Experience: Artisan Sourdough Bread Recipe

Artisan Sourdough Bread

I first became interested in baking, specifically bread making, while touring a commissary for the restaurant I worked for. During my visit, the kitchen lead explained to me that they were having an issue with their “mother dough.” I love learning different recipes, so I was immediately interested in knowing about everything he was talking about. Does the dough really have a mother? Wait, the dough is a living thing, that you feed?! What the what? My head was spinning with questions and concerns. I never knew that making Artisan Sourdough Bread was an artform!

Since this experience, I’ve learned a little more about breadmaking and specifically about sourdough. King Arthur Flour is a fantastic resource for baking and breadmaking, my friend—that was kind enough to give me a sourdough starter—turned me on to their site and it’s full of great information!

If you happen to have friends that bake or dabble in bread making, consider yourself lucky! On my journey to my first bread making experience, I lamented over acquiring a sourdough starter or piece of “mother dough.” I knew I could make my own starter using a few separate ingredients. But is that better? I was so grateful to be gifted a starter in the end. This started me on my path to an Artisan Sourdough Bread Recipe of my own!

The basics for sourdough are this:Artisan Sourdough Bread

  • Sourdough is fermented and used to start the next batch. This is a ‘leaven’ or ‘starter’ and is used instead of fresh yeast.
  • When flour mixes with warm water, it attracts bacteria, including wild yeast. The living bacteria create/ expel by-products that allow the dough to rise.
  • Bacteria from our (your) environment break down makeup of the flour, turn complex carbs into sugars, which the yeast feed on. This process produces a gas (CO2) and causes the dough to expand. Depending on your breadmaking environment your bacteria and yeast will behave differently. That’s why there’s ‘San Francisco’ Sourdough, because of the environment/ climate the dough is cultivated in.
  • When raised dough goes into an oven, the yeast will die off, but the CO bubbles are trapped inside. It’s for this reason that bread, particularly sourdough, has airy bubbles.

As I said, I acquired a starter, but you can easily make your own sourdough starter!

I loved the result of my first Artisan Sourdough Bread Recipe. I modified a few recipes into the one I used. Most are very similar anyway.
Artisan Sourdough Bread

Artisan Sourdough Bread Recipe

Print Recipe
Serves: 2 loaves Cooking Time: 3+ Hours

Ingredients

  • 1 cup of "fed" sourdough starter (This means your starter has been fed in the last 6-12 hours and has a nice, happy, bubbly consistency).
  • 1 1/4 cups of lukewarm water
  • 4-5 cups of unbleached flour
  • 1 packet (2 tsp.) active dry yeast (you can add this straight in or activate it with warm water per the instructions on the package)
  • 2 1/2 - 3 tsp. salt
  • Optional:
  • 1/4 - 1/2 tsp. of citric acid (for extra sour bread)
  • 1 tbsp. sugar in the raw

Instructions

1

Combine all ingredients and knead into a smooth ball of dough with a little bounce. You can do this by hand or for 3-5 minutes with a bread hook in a mixer.

2

Set the dough ball in a greased, covered bowl and allow it to proof/ rise for 70-100 minutes. If the bowl is large enough you can cover with plastic wrap or use a shower cap like I did. This protects the dough from drying out. Some people even use a wet towel. You just don't want the cover to touch your dough.

3

Divide the dough in half and carefully shape the dough into loaves, placing them on a greased baking sheet or parchment lined baking sheet. Allow the loaves to proof/ rise for another hour or so.

4

Preheat your oven to 425°F.

5

Slash a deep "X" through each loaf on top. Use a serrated bread knife if possible. I didn't and I read it's easier.

6

Place your loaves (on the greased baking sheet or parchment lined baking sheet) in the oven for 20-35 minutes. Check your loafs regularly every 5-10 minutes and spray them quickly and lightly with lukewarm water.


Recipe

Sweet Potato Black Bean Burger

sweet potato black bean burger

This Sweet Potato Black Bean Burger exists because a good veggie burger is hard to come by. The store bought kinds are typically bland in flavor and trying to front like some fake meat, which is gross if you ask me. What if you could fulfill your veggie burger desires in your very own kitchen? Well, you can!

Being a Lacto-Ovo vegetarian—as well as a reasonably active person—I’m always looking for new recipes and ideas to get enough protein in my diet. As many of you know, it can be increasingly difficult to fulfill your protein goals as a vegetarian. It’s not that it’s too hard, and the average person doesn’t need too much protein. As an athlete, though, it just takes more precise math and dedication to tracking your nutrition. I’ve tried a lot of veggie burgers over the years. Black bean is my favorite variation, but I had quite a bit of trouble with the quinoa & black bean burgers. They always seemed to crumble apart, which might be a user error but was annoying nonetheless. These small kitchen mishaps inspired me to look at other ingredient options. I was triumphal with this Sweet Potato Black Bean Burger.

My friends and family have been raving about this sweet potato black bean burger since I first served it with my Mango Radish Coleslaw. The sweet potato gives the burger a great consistency. Not to mention, the little bit of sweetness enhances the other spices and ingredients. I put an egg in mine for the extra protein nudge, but you could totally use vegan egg replacer or even a little Greek yogurt if you eat dairy but not eggs.

Serve this Sweet Potato Black Bean Burger with any spring or summer side. Praise and happy faces will surround you, ain’t nothing wrong with that!

sweet potato black bean burger

Sweet Potato Black Bean Burger

Print Recipe
Serves: 4-6 Cooking Time: 20 minutes

Ingredients

  • 2 sweet potatoes (peeled, cooked, mashed)
  • 1 can black beans (drained and rinsed)
  • 1 egg (you can sub greek yogurt for vegetarians and avocado or egg replacer to make it vegan)
  • 3/4 cup Panko (try a gluten free option, quinoa, or brown rice as an alternative)
  • 1 1/2+ tbsp. of coconut oil
  • 1/2 white onion, diced
  • 1/2 tsp. Eye of Newt (lol, it's ground mustard seed, Muggles!)
  • 1 tbsp. paprika
  • 1 tsp. ground cumin
  • 1/2+ tsp. salt
  • Pepper to taste

Instructions

1

Heat 1 1/2 tbsp. of oil in a pan over medium heat

2

Mix all ingredients except for oil together until you can form patties with it

3

Cook the patties in in oil for about 3 minutes each side or until golden brown.

4

Plate and serve!

Notes

You can cover the pan while the burgers cook on a slightly lower temp if you're worried about the egg getting hot enough.

DIY

Go-Bag for the Urban Witch DIY

go-bag

Lately, I’ve been trying to organize my life and efforts across the board. For the first time, I’m buying and using storage bins in my art studio. I’m categorizing notions and accessories and filing them away in their proper place. Part of this may be growing up, or an increased incentive to have a presentable and stress-free work/home environment. At any rate, I’m having a great time creating a place for everything and I’m super proud to bring you our first DIY tutorial! This DIY Go-Bag for the Urban Witch is a perfect weekend project and a great way to organize any magical supplies, sacred personal items, or even a small apothecary.

Sometimes you need to grab your supplies and hit the road in a pinch, whether it be the last minute work trip or a race to a sister in need, the best thing about this Go-Bag is that there are a ton of uses for it. It can serve as a sacred place for your travel altar or as a to-go apothecary/ medicine bag for when you’re on the move. The Go-Bag can even act as a general storage bag for magical items, stones, charms, and cards. The Go-Bag can serve whichever intention you choose. It’s up to you.

You can adjust the size of this bag based on when you intend to keep inside it. Increasing the 23″ measurement would make the bag taller/ deeper. Increasing the 15″ measurement would make the bag longer; you need the zipper to be 1″ longer than whatever your length measurement is.

GO-BAG SUPPLIESGo-Bag for the Urban Witch

  • Outer fabric 15″x23″
  • Fusible fleece
  • Inner fabric
  • Handle: 4×9 of exterior fabric and fusible fleece
  • Tab: 3×5 of interior fabric
  • 16″ zipper

Optional:

  • 4 flat bottom feet screws
  • 1 round stud fastener

GO-BAG INSTRUCTIONS

Part One:

A.) Collect all your supplies with your fabric cut to the correct size: 15″ x 23″ for bag “body” and fusible fleece and 4″ x 9″ of exterior fabric and fusible fleece for the handle. Fuse your fleece (also 15″ x 23″) to the wrong side of your handle and exterior fabric.

B.) Fuse your fleece (also 15″ x 23″) to the wrong side of your handle and exterior fabric. Now the wrong side of your handle and exterior fabric will be the fleece.

C.) Place your lining (interior fabric) right side up. Right side up means the side that will be exposed when finished is facing up.

D.) Open your zipper and line it up with the 15″ edge of your lining fabric and place it on top with the other zipper half hanging down. The pull of your zipper will be facing you. The zipper aligned as pictured, with stops 1/2″ away from the left side of the fabric. Align the exterior fabric face down/ wrong side up on top and pin for sewing. Sew your zipper with 1/4 seam allowance.

Go-Bag for the Urban Witch

Part Two:

E.) Keep your zipper open and flip the bottom raw edge of your top (exterior fabric) up so that it’s right sides are together and the bottom raw edge is now up with the zipper.

F.) Fold the outer fabric the same way to its right sides are together and its raw edge is aligned with the raw edge of the interior fabric. See in the photo below how each fabric is folded onto itself? Line up the zipper as before, this time with the zipper pull on the left.

Go-Bag for the Urban Witch

G.) Pin as shown below and sew with a 1/4″ seam allowance.

Go-Bag for the Urban Witch

Part Three:

H.) Turn the bag inside itself, so it appears as normal from the outside, with the interior fabric inside and exterior fabric outside.

I.) Top stitch your zipper on each side, going through both the exterior and lining, but not sewing it shut. You’ll have your zipper open to do this; it should end up looking top-stitched like pictured.

Go-Bag for the Urban Witch

Part Four:

J.) Now place your bag flat, zipped up, with the zipper down the center and pin through all fabrics as shown.

Go-Bag for the Urban Witch

Part Five:

K.) With your bag pinned, cut a 2 1/4″ L x 2″ H square at each corner.

Go-Bag for the Urban Witch

Part Six:

L.) Make your tab:

For the tab, fold each long edge to meet in the center and press.

Go-Bag for the Urban Witch

Then fold it in half width-wise, so the raw edges meet and press again.

Go-Bag for the Urban Witch

If you’re adding a metal tab, add it now.

Go-Bag for the Urban Witch

Top stitch the non-raw edges of the tab.

Go-Bag for the Urban Witch

Part Seven:

P.) Make Your handle:

For the handle, make sure you fused the fleece in Step One. You’ll do three folds. I find it helpful to press after each. Fold the long raw edges lengthwise to meet in the middle.

Then fold it once more in half, so your only raw edges are the 1″ ends and topstitch.

Part Eight:

Q.) Attach the tab and handle by first turning your interior and exterior fabric, so the wrong sides are out/ right sides together. Make sure all layers are aligned and unzip the zipper a few inches.

R.) Pin your handle on the end with the zipper pull as shown. Sew the aligned and pinned edge with a 1/2″ seam (or whatever your bag/ zipper allows if you resized or made mistakes it’s okay).

S.) Pin your tab upside down and “finished” end-inside in the same manner and sew the aligned edge.

T.) Turn your bag right side out through one of the square openings that are left unfinished.

Part Nine:

Now we’ll do a French seam on the square edges. A French seam is where you first sew a raw edge; then you sew over the seam from the interior to “trap” the raw edge completely. Here’s a link for french seams if it’s confusing.

U.) You’ll first want to reopen your square edge to create a box seam, this is accomplished by sewing from corner to corner, as shown. Pin each corner and sew.

V.) Trim the excess down. If you made mistakes or had rough cuts, you have had to increase seam allowance. Trim, so you only have about 1/4″ of a raw edge.

W.) Turn bag inside out. Push out your new square bottom/ corners. Use your pins to mark the seam allowance needed to trap the outer seam. Sew to complete.

X.) Your interior will look like this. Add your bag feet now if you wish, using a seam ripper to poke holes first where they will go through to the exterior.

Your completed go-bag will look like this:

Each Go-Bag will hold three or four 7 day candles, three large bundles of sage, one tarot deck, and other items as needed (crystals, pendulums, poppet, sachets, charms, travel altars, etc..) Check back here for more DIY’s and ideas for living creatively mindful.

*This post first appeared on I AM A HEALER.

Recipe

Vegan Ash-e Reshteh (Persian New Year Soup)

vegan ash-e reshteh

With Nowruz (Persian New Year, the Spring Equinox) right around the corner, I thought I’d post a recipe for a Vegan Ash-e Reshteh! There are many kinds of Ash you can make, but Ash-e Reshteh seems to be the most popular. It’s made throughout the year on my husband’s side of the family, and it’s always made for Nowruz.

I first learned to make Ash-e Reshteh shortly after my engagement to my husband. His mother had gifted me a Persian cookbook. Her quiet way of both welcoming me to the family and validating my suspicion that the key to keeping her son’s heart was through food. No doubt, I happily got to practicing my Ash and Beef Koobideh recipes, all while secretly plotting to find ways to make some of it vegan.

vegan ash-e reshteh

Ash-e Reshteh is a thick soup. It’s typically made with onion, beans, noodles, lentils, garlic, beet, spinach, herbs, spices, and beef broth. I’ve always substituted vegetable broth in the past and made a vegetarian version. Furthermore, the other non-vegan friendly ingredient is the kashk. Kashk is basically whey that’s stirred in at the end and added as a garnish. Oh, and the noodles are thought to bring luck into the New Year!

vegan ash-e reshteh

I’ve always wanted to make a Vegan Ash-e Reshteh! I thought this would be a great opportunity to try and finally make a vegan version using a recipe for garbanzo bean whipped cream I’d seen floating around.

I’m happy to share my recipe for Vegan Ash-e Reshteh.

vegan ash-e reshteh

Vegan Ash-e Reshteh

Print Recipe
Serves: 8+ Cooking Time: 1 hour

Ingredients

  • 3 tbsp. coconut oil
  • 2 large onion
  • 2 cans drained garbanzo beans
  • 1 can cannellini beans
  • 1 can red kidney beans
  • 1 heaping tbsp. garlic
  • 1 tbsp. turmeric
  • 1 heaping tsp. salt
  • 1 tsp. pepper
  • 9 cups of water (if using dried, soaked beans)
  • 10 cups veggie broth
  • 2 cups lentils
  • 1 pound linguini or Persian noodles
  • 2 tbsp. flour
  • 2 cups fresh dill
  • 3 cups fresh parsley
  • 12 cups of spinach
  • 1 beet
  • Liquid from garbanzo beans and some cream of tartar for "cream"
  • Garnish: Vegan cream and crispy caramelized onions (they're mandatory!)

Instructions

1

In a large pot heat your coconut oil over medium-high heat. Add your minced garlic and thinly sliced onion, saving some onion on the side for the garnish later. Stir fry until the onions are soft and beginning to brown

2

Add the beans, turmeric, salt and pepper and stir-fry for two minutes. If you used canned beans (I did) then you can skip Step 3

3

Add 9 cups of water and bring to a boil, reduce heat and continue cooking for 15 minutes

4

Add your veggie broth and lentils, continue cooking for 15 minutes

5

Add your noodles and slowly sift in your flour while stirring the pot. Allow the soup to cook, covered and on low, for another 15 minutes

6

Add your spinach, dill, parsley, and beet. Continue cooking another 10-15 minutes or until the noodles and lentils are both soft

7

*Add your vegan cream and stir in, saving some for the garnish.

8

Garnish with crispy caramelized onions and a dollop of "cream"

Notes

* Vegan cream: Simply combine the liquid from two cans garbanzo beans with 1/8 tsp. of cream of tartar and mix on high for 10-15 minutes or until stable and cream-like. **You can also just omit the cream entirely if you don't have a Kitchenaid or hand mixer. The soup is delicious anyway. ***The "cream" can collapse quickly and in a hot pot, it almost completely dissolves. I still liked it for the recipe because I felt it gave the soup a slightly creamier look.

Recipe

Colorful Mango Radish Coleslaw

mango radish coleslaw

Coleslaw is something I look forward to at every barbecue and potluck I attend. It’s a versatile dish and one of the more fun sides to experiment with. I came to the idea for this Mango Radish Coleslaw recipe after trying to decide on a side for my Sweet Potato Black Bean Veggie Burger. The colorful coleslaw was a perfect pairing choice and totally hit the mark!

I’m a coleslaw connoisseur. One of my favorites that I’ve had recently was a Texas style coleslaw. It was vegan but spoke to traditional Texas BBQ. The slaw had notes of paprika and chili powder, corn, red pepper, and a few other ingredients I love! It was a bit on the sweet side but smoky and robust as well. I fully intend to re-create it at some point, but for now, it’s Spring! I’d wanted to try something that would pair well with lighter flavors and go with the season.

I wanted to do a sweet, light coleslaw that was different from the norm. Something almost like a salad, full of color and flavor that dominated the mayo, rather than the other way around. It’s my firm opinion that fruits and color are highly underutilized in the coleslaw scene (is there a scene? I made that up). Some mango and radishes were on hand, so I decided to go for a Mango Radish Coleslaw.

I always incorporate ingredients that can easily be substituted for vegan options—this Mango Radish Coleslaw is no exception. This delightful dish is a delicious side and a perfect for a light snack.

mango radish coleslaw

Mango Radish Coleslaw

Print Recipe
Serves: 4 Cooking Time: 5-10 minutes

Ingredients

  • 2 cups angel hair cut cabbage/ slaw
  • 2 medium mangos, diced
  • 6 radishes, sliced
  • 1 tbsp. honey or agave
  • 1 tsp. Thai sweet chili sauce
  • 2 tbsp. mayonnaise, veganaise, or avocado
  • Juice of 1 lemon or 1/3 cup lemon juice
  • 1 medium red pepper, diced
  • Salt and pepper to taste
  • Garnish: Cherry tomatoes

Instructions

1

Slice your radishes, mangos, peppers, and grate your cabbage for slaw if you're making your own

2

Mix it all in a bowl, adding your dressings and seasonings last to toss

3

Serve!

DIY Lifestyle

Two Cute Ways to Repurpose Leftover Bunting

repurpose leftover bunting

We all have extra stuff lying around. Some of it is really useful, while some of it just takes up space. Anyone who has thrown a wedding or a big birthday knows that decor is no exception. I was eyeing all my extra stuff from our wedding and my eyes fell on all this extra burlap bunting we never used. There are quite a few tutorials out there on how to turn old wrapping paper and clothes into bunting. However, I couldn’t find many on how to actually repurpose leftover bunting.

I was thinking of various ways to use the bunting by folding it. Maybe a geometric ornament or putting a few together could make a hat or a lantern bag for a flameless candle? Eventually, I landed on an idea for a flat wallet and an air plant/ succulent holder; two cute ways to repurpose leftover bunting into new items and quick DIY projects.

FLAT WALLET

This project is great for a craft night or even for a kids party. You can complete the project by sewing OR even with a hot glue gun. Kids will love seeing how you can transform “junk” decor into something cool, useful, and personalized. Furthermore, with cute themed birthdays, the kids could end up with adorable spiderman wallets at the end of the party from the branded bunting.

I used a few items in the creation on my DIY Flat Wallet:

  • Burlap bunting
  • Scissors
  • Leftover random charms/ beads
  • Round bag making stud
  • Vinyl snap
  • Sewing machine (although you can hand stitch or use a glue gun instead)

Step One:

Collect your supplies. If you have a glue gun you’ll be using, plug it in! This is a quick project.

DIY flat wallet

Step Two:

Fold the bottom of the bunting a little over 1/3 of the way up. Test the triangle flap to make sure it covers the amount of space you want it to and doesn’t overlap the bottom.

DIY flat wallet

Step Three:

Flip the bunting over while keeping it folded. Draw a line to mark where the edges overlap.

leftover bunting


Step Four:

Cut the bunting on the lines you marked.

DIY flat wallet

Step Five:

Line up your wallet how it will lay when complete. Line up where you want your snap to be.

DIY flat wallet

Step Six:

Line up your first snap and sew the snap down to the wallet body (not the flap).

DIY flat wallet

Step Seven:

Pin the edge of your wallet for sewing and sew.

DIY flat wallet

Step Eight:

Attach the second snap to the interior of the flap.

DIY flat wallet

Step Nine:

Begin to attached your embellishments/ charms/ decor/ or embroidery to your wallet. Use a needle and thread or a hot glue gun.

DIY flat wallet

Fin!

repurpose leftover bunting

Air Plant/ Succulent Holder

The second cute way to repurpose leftover bunting is to turn it into a cute geometric planter. You can hang it on the wall or put it on a shelf. I used basically the same process for the dimensions as the wallet, the only difference is that instead of cutting the extra from the sides. You bring the edges pictured with the pink markers together and top stitch to create a tiny planter.

I used a few items in the creation on my Air Plant/ Succulent Holder:

  • Burlap bunting
  • Scissors
  • Sewing machine (although you can hand stitch or use a glue gun instead)
  • A piece of coral I found on the beach in Bali
  • Neon Green Thread

reuse leftover bunting


Once you’re done with the stitching you can add some stitches in a cool color, or add fabric to the front. I even considered using paint or dip dye on mine. Have fun with it!

reuse leftover bunting

reuse leftover bunting

I hope you enjoyed these ideas on how to repurpose leftover bunting!

Recipe

Vibrant Roasted Red Beet Hummus

Roasted Red Beet Hummus

The first time I had roasted red beet hummus, I was a total stranger to all things beets. As a teenager, I worked at a Round Table Pizza (if you don’t know what that is, you aren’t missing much). I had to work the salad bar basically every shift. These duties included refilling the various toppings. One of them—you guessed it—was beets. I’m sure the beets were canned or something, but the smell of 3 gallons of beets in juice was enough to make my stomach turn.

It took me exactly fifteen years to get over my repulsion, and it was roasted red beet hummus that did the trick!

The gorgeous color of this mysterious dip captivated me the first time I had it at a party. Once I learned it was beet hummus, I was disgusted (of course) but I didn’t want to be rude, so I tried it. It was delicious! The essence of beet was still there, but it was leveled out by the chickpeas and garlic. I was in love! This led to me eventually trying beet in my juices and now I really love it.

This roasted red beet hummus is a beautiful addition to any table. Hummus is already a healthy dish. Beets enhance it as a great source of folate (vitamin B9), fiber, manganese, vitamin C, potassium, and iron.

Roasted Red Beet Hummus

Print Recipe

Ingredients

  • 2 medium sized beets, roasted
  • 1 can of chickpeas (drained and rinsed)
  • 2 heaping tbsp. of tahini
  • Juice of 2 lemons
  • Zest of 1 lemon
  • 3 cloves of garlic
  • 1/2 tsp. salt
  • 1/4-1/3 cup of olive oil

Instructions

1

Preheat your oven to 425 degrees F

2

Rub beets with a little olive oil and wrap individually in foil, place on a baking sheet and roast for 1-1.5 hours

3

Allow beets to cool, then cut them into 1" cubes for blending

4

Place all ingredients into a blender and blend until smooth. Add water if you need to thin it out

5

Refrigerate at least 2 hours before serving (I just like cold hummus)

DIY

DIY Square Bottom Tarot Pouch

DIY Tarot Pouch

Sometimes you just need a tarot pouch! People choose to carry their tarot in different ways. Some, neatly keep the cards in their original box to bring out when they want to do a spread. Many carry their cards wrapped in a special cloth and in a pouch similar to this.

With the tarot often looked to for guidance in weighty decisions, why not treat your deck as the sacred item it is?

If you buy crystals, pendulums, and divination tools regularly, you’ll often have a small collection of velvet or plastic lined pouches at your disposal. These can be useful, but boring. For the urban witch, you might choose to carry your tarot cards in a more stylish and personalized way. That’s where this DIY Tarot Pouch comes in handy. It’s easy to make and requires very little fabric. Furthermore, this tarot pouch makes a great conversation starter, everyone will wonder where you procured such a cool bag for your cards.

This DIY will take about 30 minutes to complete depending on your skill level.

For this tarot pouch you’ll need:

  • (1) 10.5″ x 11″ exterior cloth
  • (1) 10.5 x 11″ interior lining cloth
  • Scissors
  • A sewing machine or needle and thread
  • Rope or extra fabric to create a cord
  • Set of tarot cards

Step One:

Take your lining fabric and your exterior fabric and place them with their right sides together. Pin the top edge (that will be the opening). Sew with a 1/4″ seam allowance and press the seam open afterward.

tarot pouch


Step Two:

Open your fabric so that the wrong sides are facing up as shown. Cut 1/2″ tabs on the sides of each fabric, this will mark where your cord will go.

tarot pouch

Step Three:

Press your tabs for sewing. You can do a double-fold hem or a single fold and keep the interior edges raw. I did a double fold because my fabric comes apart easily and I didn’t want any rogue string coming out the drawstring area.

tarot pouch

Step Four:

Sew the hem so it secures the raw edge of the fabric (or not if you don’t care).

tarot pouch

Step Five:

Fold your fabric in half length-wise to that the exterior fabric is exposed and the lining fabric is touching itself. Make sure your tabs line up. Pin the raw edges of the fabric together.

tarot pouch

Step Six:

Sew with a 1/4″ seam allowance. You can do a larger seam if it’s easier, you’ll cut the excess off anyway. Make sure to not sew over your drawstring opening. Otherwise, you’ll seal it shut!

tarot pouch

Step Seven:

Flip your fabric inside out so the exterior is touching and the exterior fabric is outside. This is a weird kind of double inside out. If you’re used to making bags, you know what I mean, but if not, I’ve attached the following video to explain.

Find the seam of the long edge that you just sewed (and trimmed down as much as possible) and pin it neatly.

tarot pouch


Step Eight:

You’ll now hide the raw edge of the seam by sewing down that same section (called a french seam), trapping the exterior seam inside. See, the drawstring opening is still open!

tarot pouch

Step Nine:

Turn your fabric inside out with the side seam directly in the center. At the bottom of your pouch, cut two small squares that are slightly taller than they are wide. I did around 1″.

tarot pouch

Step Ten:

Sew the very bottom raw edge of the bag closed, excluding the squares. Then, turn the squares so the bottom seam is in the center and pin them in a straight line. This will square out the bottom of your pouch. Sew each side to have squared edges. ***I should add that you don’t have to do a french seam here, I just didn’t want any raw edges on my interior, you could totally just turn the bag inside out and hem the bottom, making sure to turn the square areas.

tarot pouch

Step Eleven:

Turn the bag inside out once more and trap those raw edges with a french seam. You’ll do this on the raw edges you just sewed—so the bottom, and each squared corner.

tarot pouch

Step Twelve:

Now turn your tarot pouch inside out and insert your drawstring. It’s best to attach a safety pin to the drawstring and lead it through the opening as shown in this video. I couldn’t find a safety pin so I improvised with sewing needles.

I hope you found this DIY Tarot Pouch useful! I’d love to see pictures of the pouches you create! Tag me on IG: @thornandthimble